2024/07/09 桜井耕造
OTOBO 11.0.3インストール手順
■OTOBO 11.0.3のインストール手順
2024年5月28日に最新のOTOBO 11.0がリリースされました。OTOBOはチケット管理ができるソフトウェアで、セールスフォースやServiceNowなどのサービスと比較されることがありますが、OTOBOはオンプレミス環境に導入し、個社ごとにカスタマイズしやすいオープンソース・ソフトウェアです。まずは、一度、どのように利用できるのかを以下の手順でインストールしてみて下さい。
インストール環境は、以下となります。
Ubuntu 24.04 LTS
mariadb-server-11.4.2
otobo-11.0.3
apache 2.4.58
(1)MariaDB 11.4のインストール
//MariaDB 11.4.2のリポジトリをダウンロードします。
# curl -LsS https://downloads.mariadb.com/MariaDB/mariadb_repo_setup | sudo bash

//リポジトリを確認して、MariaDB 11.4.2がインストールされることが分かります。
# cat /etc/apt/sources.list.d/mariadb.list
---------
# MariaDB Server
# To use a different major version of the server, or to pin to a specific minor version, change URI below.
deb [arch=amd64,arm64] https://dlm.mariadb.com/repo/mariadb-server/11.4/repo/ubuntu noble main

deb [arch=amd64,arm64] https://dlm.mariadb.com/repo/mariadb-server/11.4/repo/ubuntu noble main/debug

# MariaDB MaxScale
# To use the latest stable release of MaxScale, use "latest" as the version
# To use the latest beta (or stable if no current beta) release of MaxScale, use "beta" as the version
deb [arch=amd64,arm64] https://dlm.mariadb.com/repo/maxscale/latest/apt noble main

# MariaDB Tools
deb [arch=amd64] http://downloads.mariadb.com/Tools/ubuntu noble main
---------

//MariaDB 11.4.2をインストールします。
# apt install mariadb-server

//MariaDBインストールパッケージ確認
# apt list --installed | grep mariadb
libmariadb3/unknown,now 1:11.4.2+maria~ubu2404 amd64 [installed,automatic]
mariadb-client-compat/unknown,unknown,now 1:11.4.2+maria~ubu2404 all [installed,automatic]
mariadb-client-core/unknown,now 1:11.4.2+maria~ubu2404 amd64 [installed,automatic]
mariadb-client/unknown,now 1:11.4.2+maria~ubu2404 amd64 [installed,automatic]
mariadb-common/unknown,unknown,now 1:11.4.2+maria~ubu2404 all [installed,automatic]
mariadb-server-compat/unknown,unknown,now 1:11.4.2+maria~ubu2404 all [installed,automatic]
mariadb-server-core/unknown,now 1:11.4.2+maria~ubu2404 amd64 [installed,automatic]
mariadb-server/unknown,now 1:11.4.2+maria~ubu2404 amd64 [installed]

# systemctl restart mariadb
# mysql_secure_installation

Switch to unix_socket authentication [Y/n] Y
Change the root password? [Y/n] Y  # rootのパスワードの設定
New password:
Re-enter new password:

Remove anonymous users? [Y/n] Y # 匿名ユーザを削除

Disallow root login remotely? [Y/n] Y # root ユーザでのリモートからのログインを禁止

Remove test database and access to it? [Y/n] Y # test データベースを削除

Reload privilege tables now? [Y/n] Y # 権限テーブルをリロード

Thanks for using MariaDB!
(2)OTOBO 11.0.3のインストール
# apt-get install -y libarchive-zip-perl libtimedate-perl libdatetime-perl libconvert-binhex-perl libcgi-psgi-perl libdbi-perl libdbix-connector-perl libfile-chmod-perl liblist-allutils-perl libmoo-perl libnamespace-autoclean-perl libnet-dns-perl libnet-smtp-ssl-perl libpath-class-perl libsub-exporter-perl libtemplate-perl libtext-trim-perl libtry-tiny-perl libxml-libxml-perl libyaml-libyaml-perl libdbd-mysql-perl libapache2-mod-perl2 libmail-imapclient-perl libauthen-sasl-perl libauthen-ntlm-perl libjson-xs-perl libtext-csv-xs-perl libpath-class-perl libplack-perl libplack-middleware-header-perl libplack-middleware-reverseproxy-perl libencode-hanextra-perl libio-socket-ssl-perl libnet-ldap-perl libcrypt-eksblowfish-perl libxml-libxslt-perl libxml-parser-perl libconst-fast-perl
# apt-get install -y libcapture-tiny-perl
# apt-get install -y libcss-minifier-xs-perl
# apt-get install -y libjavascript-minifier-xs-perl
# apt-get install -y libtext-csv-perl

# cd /opt
# wget https://ftp.otobo.org/pub/otobo/otobo-latest-11.0.tar.gz
# tar zxvf otobo-latest-11.0.tar.gz
# cp -r otobo-11.0.3 /opt/otobo
(3)Apacheモジュールのインストール
# apt-get install -y apache2

# a2enmod headers
# a2enmod cgid
# a2dismod mpm_event
# a2enmod mpm_prefork
# a2enmod perl
(4)OTOBOの設定
//Config.pmの設定をします。
# cp /opt/otobo/Kernel/Config.pm.dist /opt/otobo/Kernel/Config.pm
# useradd -r -U -d /opt/otobo -c 'OTOBO user' otobo -s /bin/bash
# usermod -G www-data otobo

# cp /opt/otobo/scripts/apache2-httpd-vhost-80.include.conf /etc/apache2/sites-available/zzz_otobo-80.conf
# cp /opt/otobo/scripts/apache2-httpd-vhost-443.include.conf /etc/apache2/sites-available/zzz_otobo-443.conf

# a2ensite zzz_otobo-80.conf
# a2ensite zzz_otobo-443.conf

# cp /opt/otobo/scripts/apache2-httpd.include.conf /etc/apache2/sites-available/zzz_otobo.conf
# a2ensite zzz_otobo.conf

# mkdir /opt/otobo/var/tmp
# /opt/otobo/bin/otobo.SetPermissions.pl
# systemctl restart apache2
(5)OTOBOのセットアップ
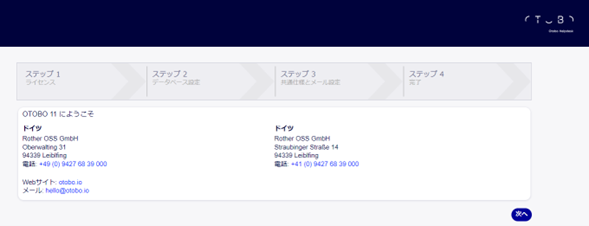
①以下のURLからOTOBOのセットアップをします。「次へ」を押下します。
http://XXX.XXX.XXX.XXX/otobo/installer.pl
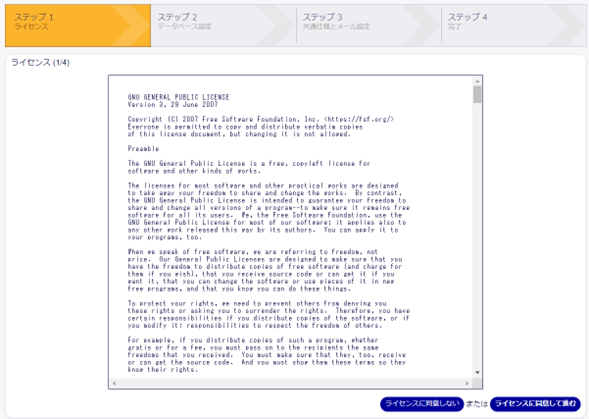
②「ライセンスに同意して進む」を押下します。
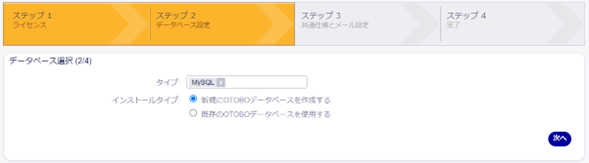
③「次へ」を押下します。
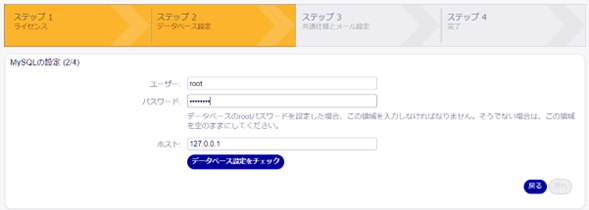
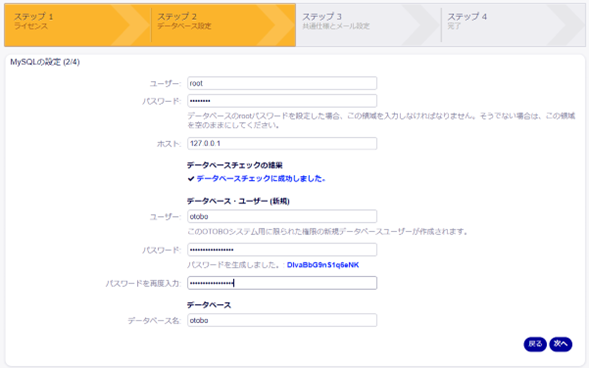
④MariaDBのrootのパスワードを入力して、「データベース設定をチェック」を押下します。
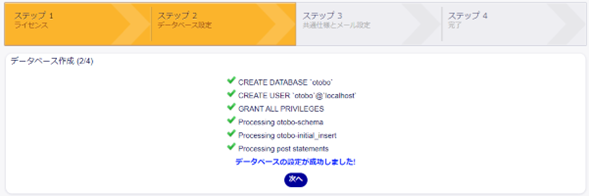
⑤以下の画面に変わりますので、そのまま「次へ」を押下します。
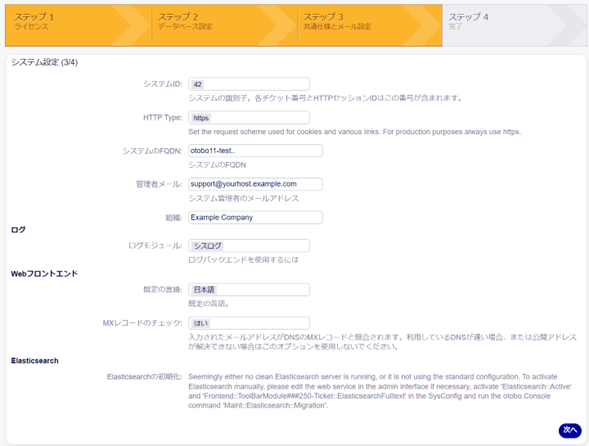
⑥続いて、「次へ」を押下します。
⑦この設定は後で設定変更できるので、「次へ」を押下します。
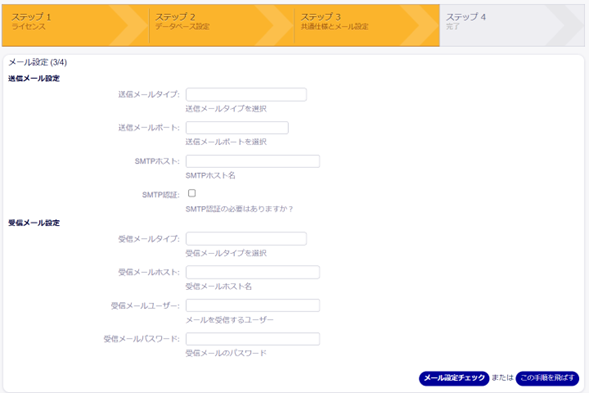
⑧「この手順を飛ばす」を押下します。
⑨これでセットアップ完了です。表示されたパスワードでログインすると、利用可能です。
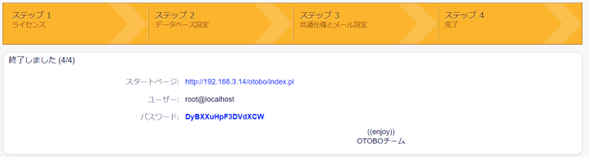
http://XXX.XXX.XXX.XXX/otobo/index.pl
ID : root@localhost
PW: 画面に表示されたパスワード
以上、Elasticsearchをインストールして設定をすると、検索性能が上がりますので、導入することを推奨しています。ここの手順は省略します。